Wednesday, March 19, 2014

Crazy for Cream Puffs

Oh how I love little, hand held sweet treats!!

Of course, it means I end up eating oh about 20, but in the moment when you are eating a small little bite of a decadent dessert it doesn't feel all that bad for you :)

Moderation is key...a key I have apparently misplaced, lost or mailed away!

Let's talk cream puffs!! I LOVE cream puffs! Plus these cream puffs are made from whole wheat flour, woo hoo!!!


They are not as complicated as you may think they are!! Much like all of my food, it just looks harder than it is...but shhhhh don't tell my secret! Let everyone ooohhh and aaahhhhh over the food please ;)

Ingredients
  • 1 cup whole wheat PASTRY flour
  • ½ cup butter (1 stick)
  • 1 cup water
  • 4 large eggs
  • 1 teaspoon vanilla extract
  •  
    You read that correctly, that it IT!!! This is more about technique than ingredients... 5 ingredients and 1 is water!
     
    Let's walk through this step by step
     
    Preheat oven to 400 degrees F, line a baking sheet with parchment paper
     
     
    Combine butter and water together in a heavy bottom pan over medium heat

     
    While butter is melting, fit an icing bag with a tip and place it in a cup for stability... this is NOT necessary, you can use a plain zip-loc style bag with the tip snipped off... just DO NOT snip the tip until you are ready to pipe.
     
     
    When butter is melted into the water, reduce heat to low and add your flour and stir until mixture forms a ball. 


     Remove from heat. Stir in eggs, one at a time, beating until dough is smooth.


    Fill your pastry or zip-loc bag
     
    Pipe golf ball sized rounds onto a parchment lined baking sheet
     
     
    Using the back of a spoon, dip it into water and gently press the tips down making a smooth surface
     
     
    Bake puff shells for 25 to 35 minutes or until puffed and golden brown. The puffs should be golden/crisp or they may collapse. Remove from oven and cool completely.
     
    At this point you can use another bag fitted with a small tip and poke your cream puff and fill with filling of choice....  Vanilla whipped cream, pastry cream, chocolate buttercream, lemon curd, etc...
    The possibilities are endless!!!
     
    Happy Eating!

    Tuesday, March 18, 2014

    Cooking Night Information!!

    Well to say that I am overwhelmed at the response is an understatement....maybe THE understatement of the century!

    I am so incredibly excited to be offering these classes and I am even more excited that there are so many other people out there who want the things I want out of cooking: Real food for real families that tastes great and is not hard to make!

    Here is the class list as of now

    Sunday March 30th - SOLD OUT
    Whole wheat Pasta, with spinach variation
    Fresh Ricotta
    Whole wheat citrus curd tart

    Monday April 14th - 1 seat left
    Whole wheat carrot cake pancakes with maple cream
    Whole wheat pop tarts
    Egg cups
    Mini green smoothies

    Sunday May 4th - SOLD OUT
    Caramelized onion, shallot, sausage savory whole wheat tart
    Zucchini ribbon salad with roasted almonds, tart cherries, shallot vinaigrette and pomegranates
    Grilled maple nectarines with infused mascarpone

    Sunday June 1st - SOLD OUT - Summer Salads/Refreshing TreatsWatermelon, feta & basil salad with balsamic reduction
    Pecan crusted strawberry balsamic chicken salad
    3 homemade all real food salad dressings
    Healthy (no added sugar) popsicles
    Citrus Granita

    Sunday June 29th SOLD OUT- Barbeque Ready
    Mayo free warm red, white and "blue" potato salad
    Caprese salad "pops" with fresh basil pesto
    Red, white and blue muffins (and other ideas for a healthy July 4th celebration)
    Homemade chocolate

    You get to leave having helped prepare and sample all of the food, plus you get food to take home with you, its the best deal around!

    Friday, March 14, 2014

    Exciting Things Coming!!!

    I've been gone forever, I'm sorry!!

    But I am back and have really exciting news to share.

    I am going to be offering small, in home cooking classes :)

    Nothing huge, just a start of something that will hopefully grow!

    Here is all the info...


    Real Food for Real Families
    Healthy, Nutritious, Great tasting food the whole family can enjoy
    ·        Do you want to feed your family healthy, great tasting meals free from preservatives and artificial additives, but don't know where to start?
    ·        Are you worried your picky eaters aren't getting enough nutrition?
    ·        Is your family busy, but you don't want to settle for fast food all the time?
    ·        Do you want to cook from scratch, avoiding boxed foods full of sodium and additives, but don't think you have the time?
    ·        Are you convinced healthy food doesn't taste good?
    ·        Do you just want more information about cooking with 'real' food?
     
    If you or someone you know has ever asked one of those questions, these classes are for you!  Come prep, sample and take home food your whole family will enjoy!
    What is included:
          All the food and supplies (2 to 3 separate meals or components)
          Written recipes and information
          Hands on cooking instruction, tips and tricks
    Cost:
          $35.00 per person, $30.00 per person if you and a friend sign up together
    A MAXIMUM of 6 people in each class, so sign up TODAY!

    Class topics change monthly, but some things you could look forward to enjoying and


    taking home include:
    Fresh whole wheat pasta
    Green Smoothies and smoothie packs
    Easy breakfast sandwiches
    Chicken quinoa bites
    Baked eggplant stacks with fresh pesto
    Homemade ricotta cheese
    Nut Butters

    Stuffed chicken roll-ups
    Sweet Potato crust quiche
    Easy Vinaigrette salad dressing
    Vanilla bean creme brulee
    Apple Turnovers
    Lemon chia seed muffins
    Coconut milk rice pudding

    I am so excited for all that is to come, plus I will still have lots of recipes coming :)


    Thursday, February 6, 2014

    Homemade 4 ingredient chocolate...and homemade peanut butter cups too!!

    Homemade Chocolate!!!!!!!

    I know, I used about a million too many exclamation points there but I am so excited to share this recipe with you all.

    I love chocolate. like, LOVE chocolate. Like eat a whole sleeve of thin mint cookies in one sitting chocolate....

    That may not be good for you, but this chocolate recipe is actually HEALTHY and GOOD for you! That's right, you don't even need to convince yourself its healthy, it really is!

    How you ask? Well let me tell you :)

    Cocoa Powder - high in magnesium and other minerals that your body needs to function properly (ones like copper and zinc)
    Coconut Oil - a super food for metabolic function - i.e. it supports and speeds up your metabolic functions (read - metabolism)
    Raw Honey - full of antibacterial properties as well an all natural energy source, and if your honey is raw it is unheated, untreated with chemicals and unprocessed

    and there you have it - homemade chocolate!!! No really, it is just that easy :)

    It will take you longer to read this whole short post than to actually make the chocolate. Let's walk through it quick.

    In a medium saucepan combine the cocoa powder and coconut oil and whisk over low until all the cocoa powder has dissolved and incorporated completely.


    Remove from the heat, add in your vanilla extract and then let it sit for a minute or two until the mixture is warm but not hot.

    Add in your honey and stir well until it has all incorporated and is smooth and glistens.

    you are DONE! Really, that is it :)

    Now, keep in mind that because you are using coconut oil you need to place this mixture into the refrigerator for a few minutes to harden. Coconut oil hardens above 76 degrees F. You need to keep the chocolate cool.

    From this step you can turn your chocolate into plain bars by spreading it (while warm and liquid) into a parchment lined cookie sheet and then just break it into chunks, into silicone molds to make shapes, etc...

    You can add different extracts, peppermint is great as well as orange, and have different flavors. You can use it as a coating for pretzels or fruit, and my favorite turn it into peanut butter cups :)

    Homemade Chocolate Peanut Butter Cups
    (makes 6 cups from standard cupcake sized silicone liners)

    1/2 cup cocoa powder
    1/2 cup coconut oil
    1/2 cup honey (raw is suggested - you can also use pure maple syrup)
    2 teaspoons pure vanilla extract
    2 tablespoons peanut butter
    2 tablespoons coconut oil (not included in the 1/2 cup listed above)

    After making the chocolate as listed above, you can continue on to form the cups. You really do need the silicone cupcake molds to make these pop right out easily.

    While the chocolate mixture is cooling a bit, combine the 2 tablespoons of both peanut butter and coconut oil in a small bowl


    Set up your silicone liners on a small sheet tray and transfer your liquid chocolate mixture into a plastic bottle. You do NOT have to do this step, it just makes it really easy to keep everything clean and helps you fill the liners easily. I got mine from bed bath and beyond for around 2 to 3 dollars. You can reuse them over and over after washing.


    Fill each liner about 1/3 of the way full with the chocolate mixture (you should use half of what you have made), this will be your bottom layer to the cup.


    Set this in the freezer for about 10 minutes until the chocolate hardens a bit.

    Fill each liner with the peanut butter mixture. You will use all of it between the 6 cups. You want to try and make sure you cover each layer pretty well so you get peanut butter in each bit...if you take bites that is and do not inhale them all at once ;)


    Set back in the freezer to harden up for another 10 minutes.

    Remove from freezer and use the rest of your chocolate to completely cover the peanut butter. This will make your cup liner about 2/3 full. This is perfect, you are NOT looking to fill up the liners.


    Freeze another 10 minutes or longer until the cups are hardened and peel away from the liner easily. I put a small dot of peanut butter on top of mine so I knew those ones were peanut butter. You can fill these bad boys with coconut butter or almond butter or whatever your heart desires.

    When these are easily removable (or you get too impatient - cough cough), remove them and EAT!

    Just remember to keep these in the fridge or else they will melt everywhere and that would be sad. I would cry. a lot.

    Take a look at these babies....and proceed to drool...it's ok, I understand.


    and then give them to your 2 year old.... but be prepared that they will in fact look like a hot mess after they finish with a bite...

    need proof...

    I warned you it won't be pretty...


    Happy Eating :)

    Tuesday, February 4, 2014

    Customizable Quinoa Bites... and some TRUTH!


    Quinoa... (pronounced Keen-Wah)...

    Here's why I use, love, obsess over quinoa...

    It is high in protein (in fact, it is a complete protein), gluten free, high in antioxidant phytonutrients, fiber, magnesium, copper, zinc, phosphorus, iron and calcium!
    From a tiny little grain that is incredibly versatile, adaptable, and easy to work with.

    You can find quinoa in virtually every store you shop at, from whole foods to wal-mart, so no excuses that you can't find any :)

    What you eat is so incredibly important. You want to nourish yourself in the very best way. It's not about calories to me, it's about real food as close to nature as possible that nourish and fuel my body the way they were intended to. No chemical crap storms please! I don't want my food created in a lab or full of artificial flavors and colors, I want REAL food.

    Real food tastes GREAT! You do not need to buy processed, fake, sugar and salt laden foods to get flavor. There are certain flavors you will never be able to make in your kitchen, the msg, artificial, lab created, chemical concoctions that do nothing but fool your brain into thinking they are real but do not nourish or fuel you properly. These type of 'foods' cause unhealthy addictions as well - have you ever tried to cut out all forms of processed sugar or caffeine?!?! hello withdrawals!

    You can make your own chocolate out of 3 ingredients that tastes amazing and contains foods that are not only real, but healthy and beneficial to your body - WHAT?! Sign me up for a chocolate fix that is healthy! :)

    There is some truth for you today, fun isn't it ;-)

    Back to the quinoa!


    I use quinoa in everything from sweet breakfast 'oatmeal' type of bowls, to additions in smoothies, to lunch or dinners. You can use it like you would rice.

    These bites are a GREAT time saver! They freeze wonderfully, are super easy to make, and it is one basic recipe that you can change up to suit your tastes - WIN!!

    I make mine in regular cupcake pans, but you can use mini ones as well!

    Here is the basic recipe

    Customizable Quinoa Bites (Base Recipe)makes about 14 regular cupcake sized bites

    2 cups cooked quinoa (make sure you rinse your quinoa before you use it to get rid of the natural bitter tasting saponins and then toast it in a dry, hot pan to toast it and bring out it's natural nuttiness until lightly brown)
                Use a 2 to 1 ratio when cooking quinoa - 2 parts liquid to 1 part dry quinoa

    2 eggs
    1 to 1.5 cup(s) breadcrumbs (I used whole wheat panko crumbs and I recommend panko for the added crunch)
    1/2 cup cooked vegetables chopped into small bite sized pieces (I used carrots, peppers, onions, garlic, but any will work as long as they are cut small enough)
    1 cup cooked chopped chicken
    1/2 cup shredded cheese (I used cheddar cheese - nope, not yellow, cheddar is actually white - they add coloring (natural) into the cheese to make it yellow)
    2 teaspoons salt
    1 teaspoon pepper
    1 teaspoon garlic powder
    1 teaspoon thyme
    1 teaspoon oregano

    I split mine up into 2 bowls because I was going to make a buffalo one and a barbeque one. Both had about 1/4 cup of sauce added in so you may need extra panko to make up for the added moisture. I used an all natural BBQ sauce mixed with a sweet chili Asian sauce and then in the other one I used a plain hot sauce with some grass fed butter.


    Preheat oven to 375 F, butter or oil your cupcake pan (or pans if using more than 1)

    Mix all ingredients together (mixture will seem a bit wet and that it ok, you just do not want it sopping wet or runny)

    Using a traditional sized ice cream scoop, fill each cupcake section, pressing it down with a spoon or your hands


    Bake for 20 to 25 minutes, or until bites are browned at the top and hold together well.

    LET COOL! You need to do this! Trust me! They need about 5 to 10 minutes to cool slightly and firm  up in the pans. If you try to remove them while really hot they will most likely fall apart.

    Carefully run a knife around the edges and remove from the pan. Serve or freeze for later :-)

    These are so yummy, healthy, filling, and best of all EASY! You can make them with any combination of spices or sauces that you want and they will always come out amazing - as long as you remember to compensate for any additional liquid with the panko crumbs.

    Happy Eating!

    Monday, January 20, 2014

    Roasted Veggies with Shallot/Herb Vinaigrette and Nutty Goat Cheese!


    Tangy.

    There is just something about that word that I don't like. What is it about a word that causes a semi-grown woman to shudder... I have no idea. I just don't like it.... But I love to TASTE tangy things...

    Lemons... Oh they just make everything better!
    Vinegar...of all kinds - balsamic, white wine, rice, red wine....
    They just take the flavor of everything you make and elevate it to a higher level making each meal quite memorable.

    In this case, I used a really easy and amazing tangy shallot and herb vinaigrette to bring to life the earthiness of roasted vegetables. I paired the veggies with a punch of protein in the form of a mini goat cheese medallion coated in crushed pistachio nuts.

    Vegetarian. Healthy. Hearty. All around amazing!


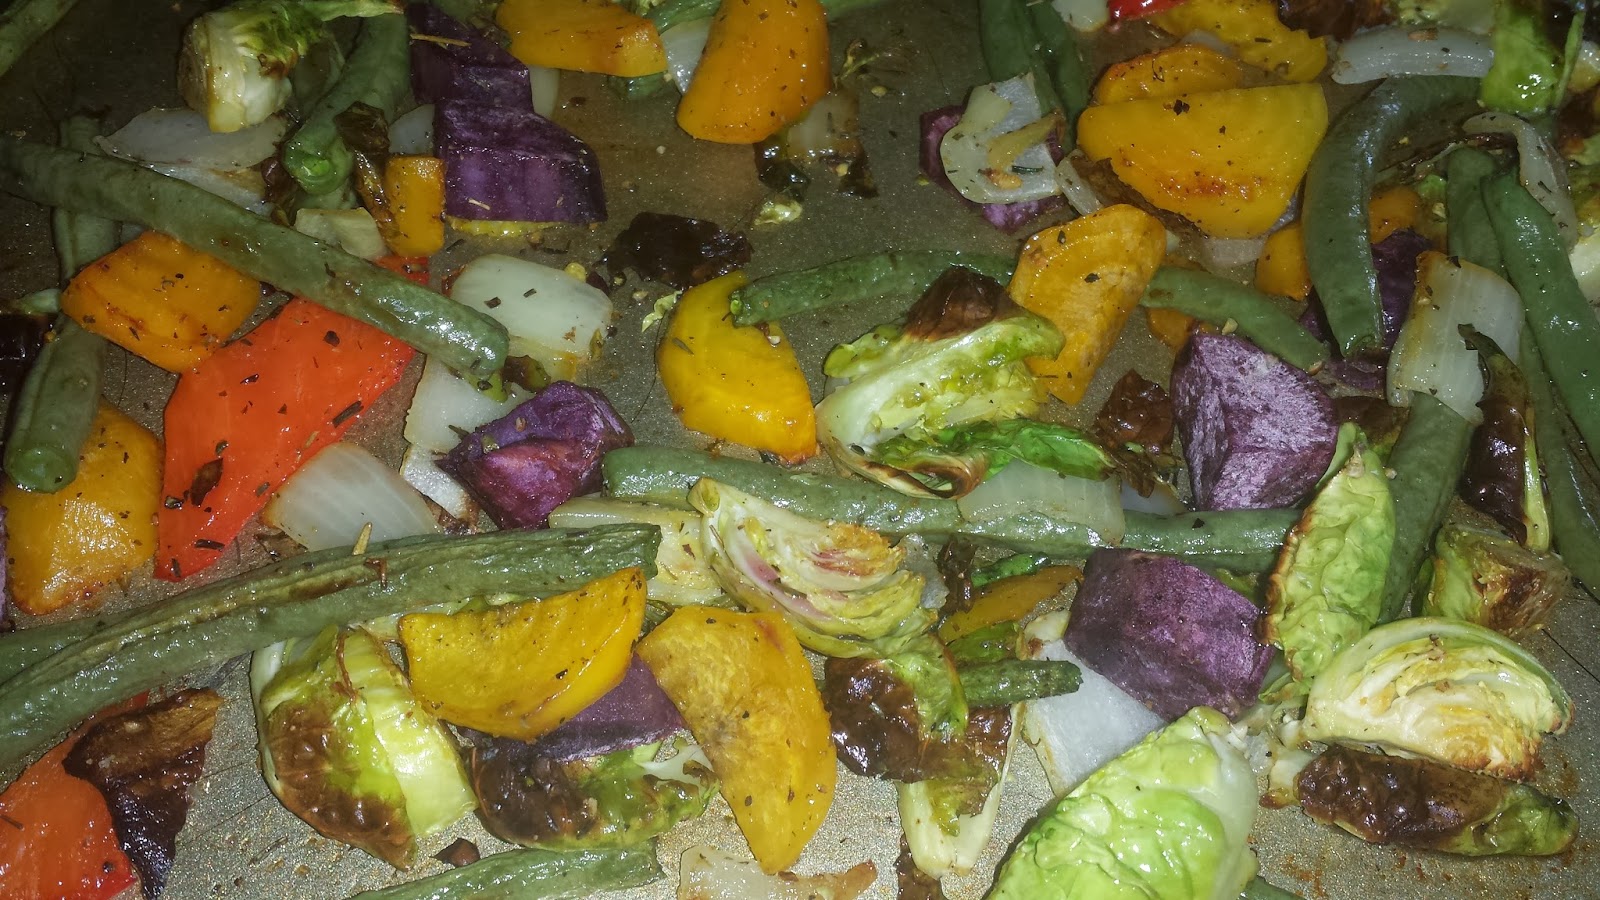
    I used a mix of red peppers, purple sweet potato, green beans, onions, Brussels sprouts and golden beets. You can use whatever vegetables your beautiful heart desires.
    Toss with a little olive or coconut oil, salt and pepper and pop into a 375 degree oven for about 25 minutes, stirring and rotating pan about half way through. Some vegetables may require less or more time, just check on them every once in a while. Don't be afraid of a little color on the veggies, this means all the natural sugars in the vegetables have come out and are caramelizing - read - sweet.


    While the veggies are roasting away, get the vinaigrette ready so it has time to let all the flavors have a chance to incorporate.
     
    I used a mix of  olive oil, lemon juice, rice vinegar, shallots, fresh parsley, dried thyme and oregano, salt, pepper, fresh garlic lemon zest and red pepper flakes. None of the ingredients are expensive or all that special but together create a bright, tangy vinaigrette that bring the earthy, charred, caramelized roasted veggies to life.


    This doesn't  look like much, but it really packs a punch and you don't want the vinaigrette to overpower the flavor of the roasted vegetables.

    While you let the vinaigrette set up and the flavors meld together, finish the last step, which is the goat cheese medallion.

    Shell some pistachios (walnuts or pecans work here as well), place them in a Ziploc bag, seal up and bang them all up until they are crushed.

    Goat cheese is usually sold in logs, and it has a bright tangy flavor that cannot be replicated by a different cheese. Just try it...

    A knife will not make a clean cut, it will get squished. Its ok, you can reform the medallions with you hands but move quickly because the heat from your hands will melt the cheese and make it sticky and hard to work with.

    A tip - use plain (not minty) dental floss to create a clean cut in a chilled log of cheese.

    Cut the medallions and just press the crushed nuts up and around all the sides and top of the cheese, when you life the cheese to transfer it to the salad, you can get the bottom coated as well.

    A touch of sweet honey will bring out the sweet undertones in the earthy roasted vegetables and help provide a great counterpart to all the tanginess of the vinaigrette.


    Let the medallions chill back up in the fridge while you combine the warm roasted veggies with the vinaigrette - you want to do this when the veggies are warm so they soak up the vinaigrette and really absorb all of the flavor.

    This makes one heck of a great lunch or a start to a fabulous dinner.

    Happy Eating!

    Roasted Veggies with Shallot/Herb Vinaigrette and Nutty Goat Cheese (serves 2)

    Roasted Vegetables
    3 cups vegetable, cut into roughly the same size pieces 2
    2 tablespoons olive or coconut oil
    2 teaspoons salt
    1 teaspoon ground pepper

    Shallot/Herb Vinaigrette
    3 tablespoons minced shallot
    1 clove garlic, minces finely
    1 tablespoon chopped parsley (fresh)
    1 teaspoon dried thyme
    1 teaspoon dried oregano
    1/2 teaspoon dried red pepper flakes (use more if you would like)
    1/2 teaspoon fresh lemon zest
    1 tablespoon fresh lemon juice
    3 tablespoons rice vinegar (unseasoned)
    2 teaspoons Dijon mustard
    about 1/4 cup olive oil - you may need more depending on how well it is mixing together
    ** add herbs first, and then lemon, rice vinegar, mustard. Mix well. Slowly add olive oil and mix until everything is incorporated and mixed well.

    Nutty Goat Cheese
    2 - 1 oz medallions of goat cheese
    about 1/4 cup of crushed, shelled pistachios
    2 teaspoons honey - I always recommend raw honey when not heating it. All of the natural enzymes are still present.

    Tuesday, November 12, 2013

    Dessert for Breakfast...Part 2 (peanut butter & jelly muffins)

    So last time we were talking about the absurd amount of sugar in traditional breakfast 'pastries'...
    43 grams in ONE pastry... um no way! Sugar crash central right there... There is just no way that eating something with that much sugar can set you up to be your best all day.

    I made the whole wheat blueberry scones last time that are amazing, with only 5 grams of sugar in one, and all of it coming from naturally derived ingredients like honey and maple syrup.

    Today it's a muffin.... the good old muffin....
    Back to that one coffeehouse what is on every corner...ONE muffin there packs almost 30 grams of sugar in ONE muffin.

    We like to think that muffins must be a good choice for us, but too many times they have the nutritional profile of a dessert, not a healthy breakfast food. They can be high in sugar and carbs but offer little to no protein; leaving us with a sugar high but starving because they have no staying power.

    So how do we make a good for you muffin that tastes amazing, is low in sugar, uses 100% whole wheat, and is packed with protein.... oh and taste good so the little munchkins will eat them :)

    Peanut Butter & Jelly Muffins!!

    Yup, you heard me... Peanut Butter & Jelly!

    Whip up a batch of these yummy, healthy, filling muffins  (make sure to freeze some for a quick breakfast on the go), and be prepared to feel amazing all day long because you started your day off right!

    Oh and remember that one muffin we talked about earlier with almost 30 grams of sugar - one of these muffins comes in at 9 grams of sugar...including the honey, maple syrup and jam! Not bad considering 1 glass of orange juice has about the same. Keep in mind that this sugar is 100% natural! Raw organic wild collected honey, pure maple syrup and fresh fruit only jam.

    Peanut Butter & Jelly Muffins
    Recipe adapted from here

    1.5 cups whole wheat pastry flour
    1 tsp baking soda
    1 tsp baking powder
    1/2 tsp salt
    1/3 cup coconut oil
    1/4 cup honey
    1/4 cup pure maple syrup (not pancake syrup or flavored syrups)
    1/2 cup buttermilk (or 1/2 cup milk with 2.5 tsps white vinegar or lemon juice and let stand 5 mins)
    1/2 cup almond milk (or regular or coconut or soy, etc...)
    1/2 cup plus 2 tablespoons peanut butter
    1 egg
    2 tsp vanilla extract
    12 -14 teaspoons of jam


    whisk dry ingredients together, set aside in a separate bowl

    In the bowl of a standing mixer, or in a bowl with a hand mixer, mix together the wet ingredients, EXCEPT for the jam, leave that aside.


    Add wet to dry and mix slowly, just until everything is incorporated. Do not over-mix or the muffins will become tough.


    Set batter in the refrigerator for about 10 minutes and preheat the oven to 350.
    Grease and flour the 12 cups of a muffin tin and set aside

    After 10 minutes in the refrigerator, gently mix the batter and then use about 1/2 of an ice cream scoop to cover the bottom of each tin, place just over 1 tsp of jam of your choice in the middle, and then cover with an additional 1/2 scoop of batter. You want to make sure there is enough batter on the bottom so that the jam doesn't hit the metal, and again enough to cover the jam completely. If the jam is exposed and hits the metal, it will caramelize and stick to the tin - ask me how I know ;)


    Bake at 350 for about 20 minutes. LET COOL, I know, I know, this is the hardest for me too, but the jam needs a few minutes to set up.


    Eat, feel great, feel full, live life.... Happy Eating!